Artwork Checklist for Print-Ready Coffee Bag Dielines
Ensure your artwork files are production-ready in one go. Follow this checklist to avoid delays, extra costs and print errors.
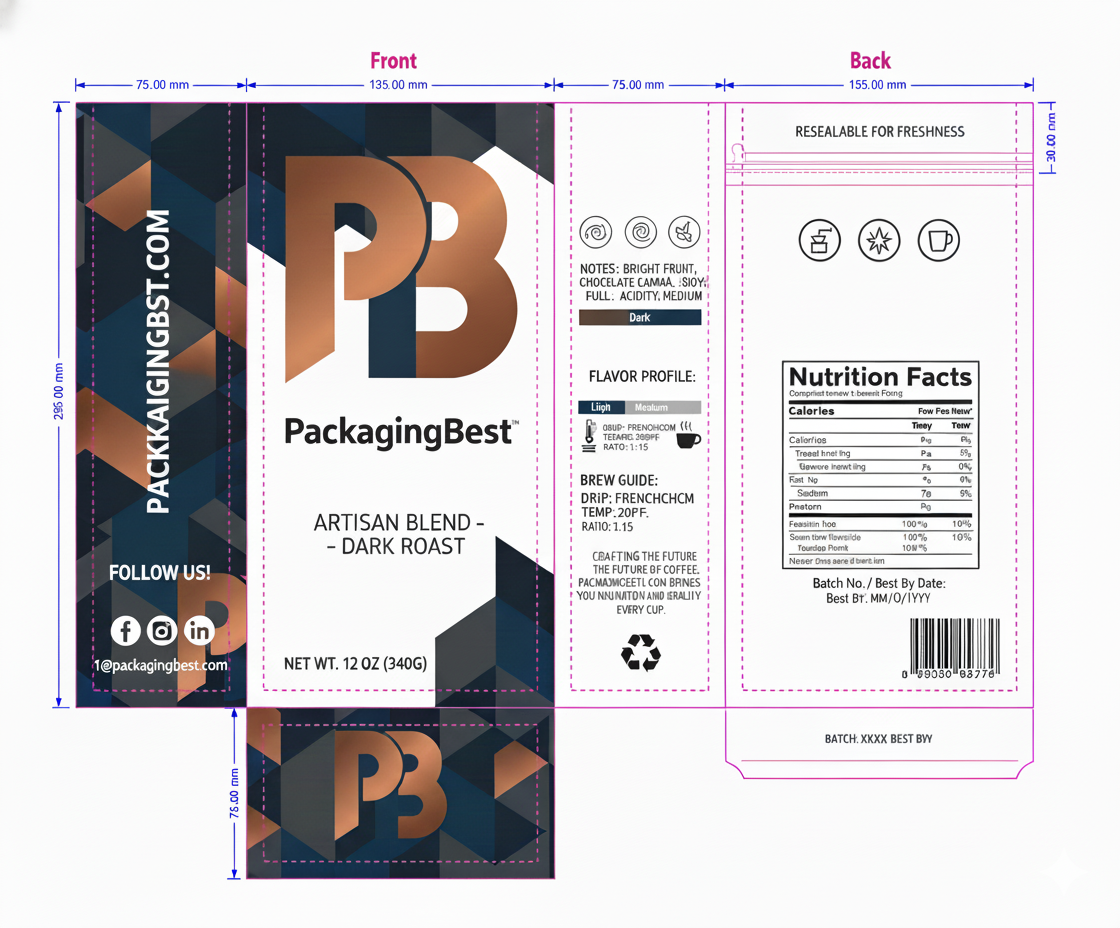
Bleed & Safe Area
Follow the template. Some printers recommend 0.125" bleed, others specify 2 mm—use the values shown on the dieline you download.
Zipper & Seal Zones
Avoid critical items (barcodes, certification marks) across zipper or heavy seal areas.
Valve Placement
Keep away from seams, top-center or back-top is common. Creative placement is fine if structure isn’t compromised.
Layers & Spot Colors
Keep dieline on a separate layer, name the cut line as a spot color (e.g., CutContour) and enable overprint, outline text, manage white-ink/varnish layers.
Proofing
Request a digital/physical proof before mass production.
Need a different size, zipper, valve position, or window? Tell us the coffee weight and any add-ons. We’ll send a verified, print-ready dieline and review your artwork for fit before production.
FAQs About Coffee Packaging Bag Dieline
What is a coffee bag dieline?
A dieline is the technical template showing cut, fold/crease, glue areas, trim, bleed and safe zones so your artwork fits the finished pouch precisely. Use it to place graphics layer-by-layer before export. Always follow the notes on the template you download.
Which pouch styles do you support?
Stand-Up (bottom-gusset), Flat Bottom (box-bottom), and Side-Gusset coffee bags. We provide multiple popular sizes (e.g., 4 oz–5 lb / 1 kg). Choose your style, then download the matching dieline.
What bleed and safe margins should I use?
Many print workflows call for 0.079″ (≈2 mm) bleed and keeping key text/logos ≥0.079″ inside the cut line. Final values may vary—use the value printed on your dieline.
What file formats and color settings do you accept?
Submit AI or print-ready PDF in CMYK. Keep structural lines as separate spot colors (e.g., Dieline/Cut, Crease, White Ink, Varnish). Outline fonts and embed/ link high-res images.
Can I place artwork across zippers, seal or heavy seam areas?
You can, but avoid mission-critical details (barcodes, fine text) near seals/zipper zones because slight distortion may occur. Respect the caution notes shown on your template.
Where should the degassing valve go?
Keep valves away from seams to protect structural strength. Top-center or along the centerline near the top is commonly used. Confirm the final position on your dieline and during proofing.
Does “12 oz” always map to one fixed flat size?
No. Outer dimensions vary by supplier and style (Stand-Up vs Flat Bottom vs Side-Gusset). Your downloaded dieline governs final cuts and usable print area.
Do you provide custom dielines or engineer review?
Yes—share style, weight/fill, zipper type, valve position (plus window/finish if any). We’ll return a production-ready dieline and review your file before proofing.
How should I name or set up special layers (die/varnish/white ink)?
Keep the dieline on its own layer and mark technical layers as named spot colors (e.g., Dieline, White Ink, Varnish). Do not convert these to CMYK, keep them as spot for RIP.
What image resolution should I target?
Use linked/embedded artwork at 300 dpi or higher for crisp results. Low-resolution images can produce soft edges after print.
WhatsApp us
Ask For A Quick Quote
We will contact you within 1 working day, please pay attention to the email with the suffix “@packagingbest.com” or “@dlboxmaker.com”.